Punch Locking Tab – use with a round punch
Hopefully, if you have the occasion to use locking tabs in your die designs you’ve taken advantage of the automated Punch Locking Tab function in LogoPress. If you haven’t, make sure you search the LogoPress help file for “Punch Locking Tab”.
I’ve just realized today that the help file doesn’t document how to use a Punch Locking Tab with a round punch yet. We’ll get that updated, in the meantime, here’s how:
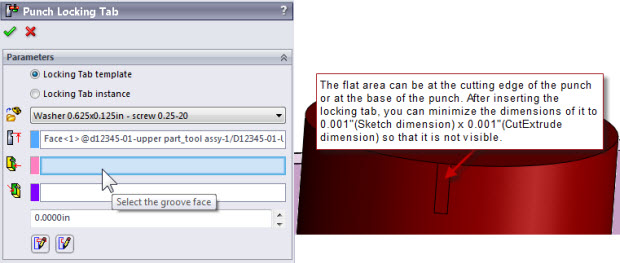
You need to edit the round punch first and add a flat area to the outer diameter of the punch at the same radial position that you want the locking tab to be at. (You might find that using a 3 Point Center Rectangle in your sketch is efficient for this and then using a CutExtrude…) This flat area will be what you will pick for the “groove face” selection. This flat area can be either at the base of the punch or at the cutting end of the punch and can be as little as 0.001” deep (Sketch dimension) x 0.001” deep(CutExtrude dimension). (Hint – make the depth of the CutExtrude 0.376” deep so you have a nice big target to select for your second pick, which is the groove face. Then, after applying the locking tab, change the 0.376” dimension to 0.001”.)
Topics
- -IMPORTANT-1- info for LP users
- -IMPORTANT-2- info for LP users
- LP 123GO Light
- LP 123GO Full
- LP How-To's for users
- LP Standard Components
- LP tips & tricks
- LP Unbending
- LP Warning messages
- SolidWorks tips & tricks
- General tips & tricks for all
- Windows tips & tricks
- A great use for WAX (stretch webs)
- Computer performance
- Computer benchmark
- Software we use
- FREE software
- Uncategorized